Thursday, July 18, 2019

Final Project For FPA150

Week 11 & 12 

In these weeks, we from class 2G group B were discussed the model that we need to present in week 13. The model must relate to agriculture and can use in nurseries.


All members group were discussed together about the project.


sketch of innovation project


Week 13

In this week, all students from part 2 need to present their final project to the lecturers. Our project for this semester is vertical planting.  
vertical planting innovation

 Project description
Vertical planting is a planting that grows upward using pvc pipe with additional planting access.
Anything grown on a pvc pipe or even fence is technically part of a vertical farming. This technique can be used to create more space between different areas.
More recently, vertical planting can also be used to grow herb and even vegetables.

 procedure to create the project 

1. cut mineral bottle 1.5litre into two parts (a) and (b) used knife (figure 1.0)
2. Make a hole on the cover used nail and the rope was inserted into the hole.
3. Make two small holes on the wall of bottle part a.
4. insert bottle part (a) into bottle(b).
5. repeated this steps for the next bottle.
6. make two small holes on pvc pipe for eight parts used the pvc cutter. Four parts at the top and four parts at the middle of the pvc pipe.
7. make 4 round holes at the bottom of the pvc pipe.
8. Tied all the bottles on each small hole at the pvc pipe used the wire.
9. make 8 small holes on the base of round container as water duct container.
10. attached the base of round container to the surface of pvc pipe used super glue.
11. inserted rafia ropes into each holes of water duct container and connected to each bottles.
12. put soil into pail into pvc pipe for the stability of tower planting 

      Vertical farming is becoming more attractive  especially for urban residents. They are very useful in provide more plants for the plant's growing population, while reducing the pressure placed on traditional farms. Vertical farms would reduce the overuse of land and would allow for regular production. The technology of vertical farms is the best because of its efficiency.  We hope to make vertical farms stack crops even higher, allowing for a greater production per farm. Hopefully they become common and popular for every city and hopefully we can be a part of that process and make a different in our farming.


Wednesday, July 17, 2019

Culling

Hello, welcome back to my blog. In week 10, we learn about culling.

   Culling is possibly one of the most important procedures to be carried out in the nursery. Process to remove any abnormal seedlings & retain the good ones. The number of seedlings to be culled ranges from as little as 5 – 10% to as high as 40 – 50% depending on the plant materials used. Culling rate in a well-managed nursery should be less than 25%

Purpose of culling:
1)To determine only the very good palm seedlings are planted in the field
2)To prevent the field planting of potential low yielding or no yield at all seedlings

Generally, 2 rounds of culling are carried out in the SINGLE STAGE NURSERY for abnormal seedlings:
1)3 months after seeds germination
2)Final selection at the time of field planting @ at 12 months after seeds germination whichever comes earlier

Generally, 3 rounds of culling are carried out in the DOUBLE STAGE NURSERY for abnormal seedlings:
1)When the seedlings are about 3 – 4 months old. Before transplanting the seedling from pre-nursery to main nursery - PS
2)When seedlings are about 7 months old (3 - 4 months after transplanting - MN
3)Final selection at the time of field planting @ at 12 months after seeds germination whichever comes earlier - MN


CULLING IN PRE NURSERY & SINGLE STAGE NURSERY (EARLY STAGE)

The main types of undesirable palms (should be culled) at this stage are as follows:
-Narrow leaf
-Grass leaf
-Rolled leaf
-Twisted leaf
-Crinkled leaf
-Collante
-Stunted or weak (runts) palms

-Chimaera 

 Chimaera and Narrow pinnae problem

HARDENING PROCESS
From polybag to soil 
To introduce harsh environment to the plants
To reduce pest
Increases possibilities so that the plants can survive

CALCULATION EXAMPLE

1 tree = 1 kg              1 sack = 50 kg 

1 sack / 50 kg = kg / 143 trees  = (143 trees / hectare) x 500 hectare
                       = 1430 sacks

1 hectare = 100 m x 100 m
               = 10000 meter square
We were discussed and answered the question given by lecturers by using the formula above.

Prunning

Hi, thanks for visit my blog. In this week which is week 9, our activity is prunning.

lecturer gave some information about prunning


Pruning involve the selective removal of certain parts of a plant, such as branches, buds, or roots. Reasons to prune plants include deadwood removal, shaping (by controlling or redirecting growth), improving or sustaining health, reducing risk from falling branches, preparing nursery specimens for transplanting, and both harvesting and increasing the yield or quality of flowers and fruits.

We were given an example of pruning which is Root pruning. Root pruning is the process of cutting back long roots to encourage a tree or shrub to form new roots closer to the trunk (common in potted plants too). Tree root pruning is an essential step when you are transplanting an established tree or shrub. 
Pruning tree roots before planting reduces transplant shock when the moving day comes. Root pruning trees and shrubs is a process intended to replace the lengthy roots with roots closer to the trunk that can be included in the root ball.

There are some advantages of pruning, which is pruning can improves sunlight penetration and increase air movement through the tree. Pruning also develops the structure of the tree so that it can support the crop load. 


Then, we were briefed about Transplanting. Transplanting is the process of removing a plant from the place where it has been growing and replanting it in another. The major requirement in transplanting (especially of larger plants) is a sufficient water supply, since the roots are almost inevitably injured in the process. Transplanting uses double stage.

In the first stage, 2 - 4 months can transplant from small polybag ( 6 x 9 inch) to big
polybag ( 15 x 18 inch ).


Watering
Prepare big polybag with soil medium
Sandy Clay Loam ( best soil) for 2 cm
In the second stage :
Remove the polybag
Make holes
Put fertilizer 
Fill up the soil
Apply mulching
Lecturer briefed to student the proper technique for prunning
Pruning is necessary to:

1.  Maintain or reduce plant size.
a.Pruning can prevent a plant from overgrowing its space in the landscape and eliminates the need for drastic cutting of crowded, overgrown plants.
b.It can allow for growth of plants under or adjacent to the pruned plant.
c.It can also serve to reduce leaf area on newly planted trees and shrubs.
2.  Remove undesirable growth.
a.Pruning can encourage plant vigor through the removal of weak, overcrowded growth.
b.Such thinning often improves the visual balance or symmetry of the plant.


3.  Remove dead, diseased, or broken branches.
a.Pruning will aid in maintaining the shape, vigor, and health of the plant.
4.  Stimulate flowering and fruiting.
a.Removal of the current year’s old, faded flowers and fruit clusters will promote flower buds for the following season.
5.  Rejuvenate and restore old plants to vigorous growth.
a.Proper pruning can restore a youthful, natural growth habit in certain overgrown shrubs.
6.  Direct the plant’s growth to a particular direction.


 What techniques are used to prune trees safely?
 General rules of pruning:

Make cuts that will cause the least amount of damage to the tree.
Begin pruning the tree while young.
Choose tools most suited for job, keep tools sharp and utilize safe practices.

Pruning Equipment

Students were taught by planters executive to prunning the plant


WEED,PEST AND DISEASE CONTROL

Hi, welcome back to my blog. In week 8, our activities are to learn about weed, pest and disease control and management.

Madam Amira and Madam Wahida briefed to student about chemical control (pesticides)

Chemical control. Chemical pesticides are often used to control diseases pest or weed. Chemical control is based on substances that are toxic(poisonous) to the pests involved. When chemical pesticides are applied to protect plants from pests, diseases or overgrowth by weeds, we speak of plant protection products. It is of course important that the plant that needs protection does not itself suffer from the toxic effects of the protection products.
The advantages of chemical pesticides are widespread due to their relatively low cost, the ease with which they can be applied and their effectiveness, availability and stability. Chemical pesticides are generally fast-acting, which limits the damage done to crops.

Chemical pesticides have some major drawbacks, but they are still widely sold and used. The disadvantages of chemical pesticides here. First, chemical pesticides are often not just toxic to the organisms for which they were intended, but also to other organisms. Chemical pesticides can be subdivided into two groups: non-selective and selective pesticides. The non-selective products are the most harmful, because they kill all kinds of organisms, including harmless and useful species and resistance. Pesticides are often effective for only a short period on a particular organisms.

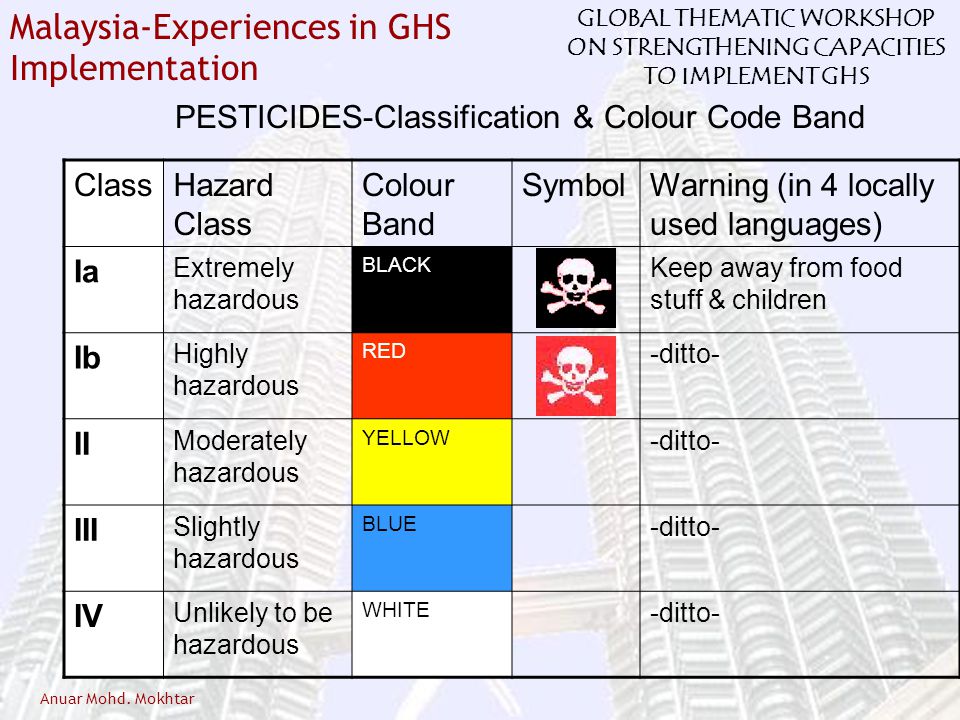
Image result for classification of pesticides
The classification of Pesticides

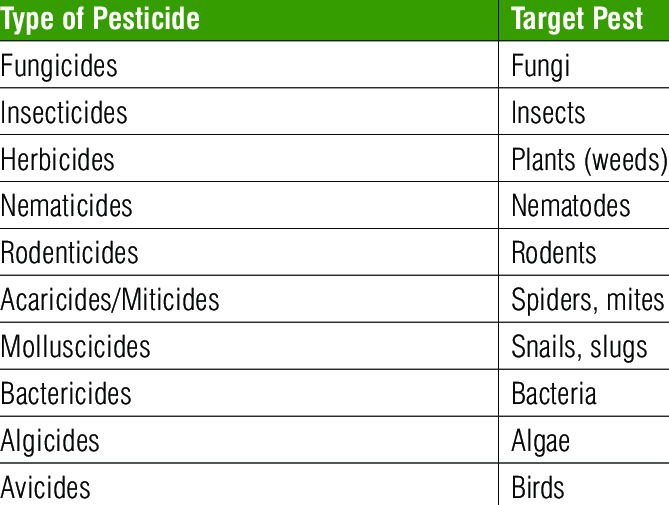
Image result for types of pesticides
Type of pesticide

Pesticides can pose hazards to humans. The severity of a harmful effect or poisoning depends on the pesticide’s chemical makeup and formulation, its path into the body, the amount that enters the body, and the length of exposure. Before you start spraying pesticides, you need to wear Personal Protective Equipment (PPE). By wearing this it can greatly reduce the potential for dermal, inhalation, eye, and oral exposure, and thereby significantly reduce the chances of a pesticide poisoning.


PESTICIDE CALCULATION

1) SPRAY VOLUME PER HECTARE 

     SWATH WIDTH (m)          NOZZLE DISCHARGE (l/min)        WALKING SPEED (m/min)
  • Nozzle diameter                -Pump for 1 minute.                           - after 1 minute
     = (Nozzle discharge l /min) / (Walking speed) swath width x ( 1000 meter square / 1 hectare )

2)   C1V1 = C2V2

    C1 = % of formulation ( On the label )
    V1 = X
    C2 = % of AI  (active ingredients recommended) 
    V2 = Spray volume per hectare
 
Example :
       Swath width / 1.2m                      Nozzle discharge / 1.5 l/min

Walking speed = 46.4 m/min                 1.5 / 46.4(1.2) x 1000/1 = 269.4 liter per hectare

 
Students were spraying pesticides around the rubber tree plot

Propagation Technique

  Hi, welcome back to my blog. In this entry, I will share with you about week 7. In this week, we learned about propagation technique which is . By the way, before we proceed to this activity, we gathered at the farm workshop. Mr. Farid Bin Zainon who is alumni of UiTM in plantation course was shared with us about his experienced and his plantation knowledge.
Mr. Farid gave talk about plantation management in FELDA
   Next, Madam briefed  about propagation technique. There are several type of propagation technique which is seeding, cutting, layering and grafting.


Process of creating new plants from a variety of sources: seeds, cuttings, bulbs and other plant parts. Define as propagation as production of new individuals from a selected plant having all the characters of the original one. Plant Propagation is the technique of making two or more plants where previously there was one. By using various methods we can produce exact replicas that perpetuate much loved varieties or we can create entire new plants that may become favorites of the future. This refers to process of creating new plants from seeds, grafting, buddings, cuttings, tissue culture method.

Types of Plant Propagation 

Sexual Propagation
Recombination of genetic materials to form uniquely genetic individual through the formation of seed
Asexual Propagation
Use of vegetative organs to create plantlets genetically identical to parent plant (clone)

1. Sexual propagation


In this method, plant propagation is done through seeds or spore that is separated from the parent plant.
It is also known as seed propagation
Use of involve of the sexes, referring to the contribution of both the male and female gametes in the production of new plants.
Seeds are produced as a result by sexual reproduction in fruits of the plants.
A plant grown from seed may have different characteristics than its parent tree


2. Layering

Layering is a means of plant propagation in which a portion of an aerial stem grows roots while still attached to the parent plant and then detaches as an independent plant.
Layering has evolved as a common means of vegetative propagation of numerous species in natural environments.
Layering is also utilized by horticulturists to propagate desirable plants.
Natural layering typically occurs when a branch touches the ground, whereupon it produces adventitious root.


3. Grafting

Grafting or Graf tage is a horticultural technique where by tissue from one plant are inserted into those another.
The technique is most commonly used asexually propagation of commercially grown plants.
Eg: Durian, mango etc


Grafting and bud grafting:


4. Micropropagation/tissue culture

Practice of rapidly multiplying stock plant material to produce a large number of progeny plants, using modern plant tissue culture methods. Is used to multiply noble plants such as those that have been genetically modified or bred through conventional plant breeding methods.


5. CUTTINGS

One of the easiest way of plant propagation is by using cutting from various parts of plants such as:
ØStem cuttings
ØRoot cuttings
ØLeaf cuttings

A piece of the stem or root of the source plant is placed in a suitable medium such as moist soil, potting mix, coir or rock wool.

The cutting produces new roots, stems, or both, and thus becomes a new plant independent of the parent.

In this week, we learnt and did the grafting, budding and marcoting techniques for the plants.

Grafting and budding techniques

We applied Plant hormone for the faster growth of plant

Lecturer shows the marcoting technique to student

Thursday, June 20, 2019

Fertilizer Application

   
        Hi, welcome back to my blog. For this entry, I want to share with you about activity we have done in week 6. In this week, we have learned a lot things about fertiziler. First of all, we need gathered at plantation workshop to listen briefing from Madam Salwa.


6.1 Madam Salwa introduced to students about fertilizers.

Madam Salwa introduced and explained to students about type of fertilizers and how to apply the fertilizer. Madam Salwa also show sample all type of fertilizers to students.

6.2 Types of fertilizers in the workshop

 6.3 Madam Salwa explained to students how to identify the composition of nutrient in fertilizer


Micronutrient

  • Fertile soil contain sufficient amount of micronutrient to meet the plant’s requirement
  • The micronutrients consist of seven essential elements: boron, copper, chlorine, iron, manganese, molybdenum, and zinc.
  •  These elements occur in very small amounts in both soils and plants, but their role is equally as important as the primary or secondary nutrients. 
  • A deficiency of one or more of the micronutrients can lead to severe depression in growth, yield, and crop quality. 

Macronutrient

  • Fertile soil contain sufficient amount of macronutrient to meet the plant’s requirement
  • Plants need relatively large amounts of nitrogen, phosphorus, and potassium. These nutrients are referred to as primary nutrients. 
  • The three secondary elements, calcium, magnesium, and sulfur, are required in smaller amounts than the primary nutrients. 


Secondary macro nutrients such as:
-Calcium (Ca), Magnesium (Mg) Sulfur (S)
  • Micro elements are also known as trace elements and sometimes people even call them the "multi vitamins" for plants. 
  • The micro elements of plants are made up of:
-Iron (Fe), Zinc (Zn), Manganese (MN), Boron (B),
    Molybdenum (Mo) and Copper (Cu)


Deficiency symptoms 

                                            Mn Interveinal chlorosis & stunting
                                             B            General stunting, white young leaves 
                                             Mo Similar to N deficiency
                                             Cl           Chlorosis & necrosis of leaves


Composition of nutrient in fertilizer

For your information, Severe foliar symptom of oil palm,
  •  Spears and fronds are often collapsed and yield is negligible
  • In such cases, Ganoderma fruiting bodies and lesions are often readily seen on the bottom parts of the palm 


DISEASES – BASAL STEM ROT (BSR)